 When it comes to remodeling a kitchen or bath, knowing the order in which it is recommended to do things can save a lot of headaches. You don’t want people coming in and working on top of each other, nor do you want them to damage work that has already been done. When you know the best order, it not only can save time, but money as well. When certain things are done out of order it can actually end up costing you more money in the long run.
The recommendations below make sense in most situations, but not all. Your project may need to have the schedule tweaked for many reasons, but this will give you the guidelines that can help you avoid problems or errors. Taking some time to plan these things out will make for a more successful remodel and no surprises in the end.
Steps to a Successful Remodel
- Turn it Off! – Before attempting any of the phases below, make sure everything is turned off, unhooked, unplugged, whatever! This means turning off your power, water supply, and anything else that is necessary. You don’t want to be shocked, have water damage, or anything else before you even begin!
- Get Permits – Most people don’t realize the significance of getting permits. Look at your state and county requirements to determine what permits, if any, are required for your remodel. Some states won’t give your credit for your home improvements when you go to resale if the job was not permitted and inspected.
- Demolition – Out with the old! Before anything can be accomplished the old cabinets and other items need to be removed. Remove any other fixtures such as toilets or bathtubs. If you are changing a backsplash, that will need to be removed as well. Whether you are donating to Habitat for Humanity or just junking the cabinets have a plan and know where the old stuff is going. You don’t want them sitting in the workspace and hindering the contractors.
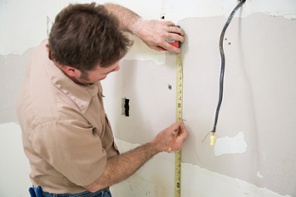
- Change any Plumbing or Electrical – With the kitchen or bathroom completely cleaned out now is the time to do any new electrical or plumbing work. It is much easier to move pipes and move or install electrical outlets. It is also a good time to replace and change out older plumbing. You can prevent any leaks or damage down the road. Any damage that is done to the wall can be fixed later. Don’t forget to move any light switches, plugs, and update wiring to be current with today’s code and appliances.
- Patch and Sheetrock – Before installing any flooring or cabinets fix any sheetrock issues. It can get quite messy and you don’t want to be cleaning those new appliances and cabinets with sheetrock dust. Not to mention it makes it more difficult to repair the wall if cabinets are already installed.
- Paint – Many contractors will recommend painting the walls before installing the cabinets knowing there will have to be some touch up work later. It’s easier for the painters to not have to worry about getting paint on the cabinets or damaging them in any way.
- Install Flooring – This next step is a little bit of a debate. For cabinet installers it is much easier to just install the cabinets right on top of the flooring. However, depending on the size of your kitchen you may be paying for flooring that just gets covered up. You also run the risk of damaging the floors if they are installed (or finished) when the cabinet installer is working. On the flip side if the cabinets are installed first then they have to be built up (typically ¾”) for the flooring that will go in later. And it is a little more work to get the floor to but up right next to the cabinets when there are a lot more bends and turns. A lot of it depends on the flooring that you choose. If you do the flooring first, make sure you put down something to protect it. We recommend you discuss this with your contractor to decide what is best for your project.
- Install Cabinets – With the plumbing, electrical, and newly painted walls your kitchen or bathroom is now ready for the cabinets. Typically the company you purchased the cabinets from will provide you with a qualified and experienced installer. Properly installed cabinets will have the biggest effect on your remodel. Once cabinets are installed then hardware can be added.
- Install Countertops and Backsplash – First, a word of warning. For some reason, as soon as you install countertops, it’s like there is an automatic sign that appears and says “FREE WORKSPACE!”. Contractors and workers can’t resist using the countertop space because it’s so convenient. Take measures to ensure the countertops are not damaged from workers using them as a workbench. Once cabinets and countertops are done, the backsplash can be installed.
- Trim Work and Baseboards – Now it is time to add the finishing touches. Any crown molding for the room or baseboards should be installed. This is also when the shoe molding should be installed around the base of the cabinets. Once this is complete finish any touch up or paint that still needs to be done.
- Install Sinks, Faucets, and Bathroom Fixtures – It’s time to install the sinks, bathroom fixtures such as toilets and bath/showers, and the faucets. This should be the plumber’s final trip to the job.
- Install Appliances – Once the countertop and backsplash are in, baseboards and trim work is complete, you can schedule delivery for appliances. If you have something protecting the floor you will want to keep it down until the appliances have been installed correctly to prevent them from damaging or scratching your new floors.
- Final Clean Up – You are finally finished and it is time to clean up the dust once and for all, and enjoy your newly remodeled kitchen or bathroom.
Recent Comments